September 2018 – Fancy Yarns

Kim Morgan from the Saori Shed in Diss gave a wonderful talk and demonstration on how to make fancy yarns. She begun by showing how she uses the drum carder to mix various types of fibre, ‘sandwiching’ the lumpy stuff between layers of smoother fibres before feeding in. Then she demonstrated how she spins different yarns from these batts, showing how to make a corespun yarn, and various ways to ply the amazingly textured singles this makes.

She brought along many examples of different art yarns, some of which had been woven in the Saori style.

Thank you Kim for a wonderfully interesting and inspirational talk!


How to use a drum carder: Part 3, blending fibres

This tutorial was originally published on vampy.co.uk all the way back in 2009, and has been updated slightly for use here.

This tutorial will show you how I use my drum carder to blend different colours and fibres to make batts. If you don’t already know how to use your carder, check out my first post on the subject about the basics first, as it contains a few tips on how to get the best from your carder.

In this tutorial I am working with commercially dyed merino tops, and sparkle in the form of trilobal nylon (sometimes called firestar) and angelina. Any commercially prepped fibre can be used in this way. If you are wanting to blend any fibres with raw fleece, it’s easiest to first prepare the fleece as shown in this tutorial before moving on to blending.

I won’t be talking about colour or fibre choices, simply the mechanics of using the carder to get the results you want. There is plenty of information online about which fibres work well together, and the book ‘Color in Spinning’ by Deb Menz contains great in-depth information and explainantions about colour theory and selecting colours for your fibre.

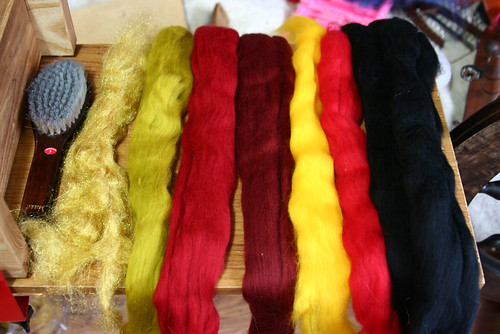
My first batt is for a swap partner who previously won some batts in a competition I ran. She asked for another batt that would go with these existing batts so she could use them all in a project together. I decided to go with deep reds and black, with a little yellow, and lots of gold sparkle. I wanted the batt to be fairly well blended, but not a completely even colour all over. Here are the colours I decided to use:

2

(as an aside, the table I use for my carding in these pictures is a knitting machine table, it’s exactly the same width as the carder, and has space either side for my fibre and tools…and it cab easily fold down so it doesn’t take up too much space)

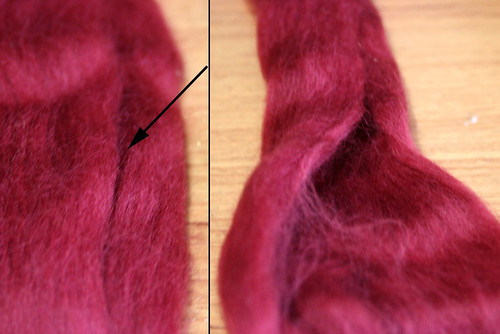
Once you have picked your fibre, you need to get it ready for carding. My eureka moment with this came when I realised that commercial tops aren’t a long sausage of fibre as I’d originally thought, but are in fact a flat sheet of fibre, folded or rollled up. To spread the fibre out to run it through the carder, you just need to find the join, and flatten the fibre out:

3

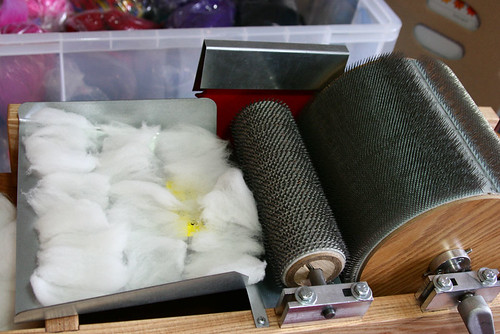
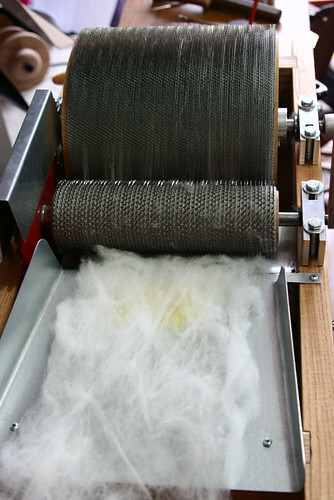
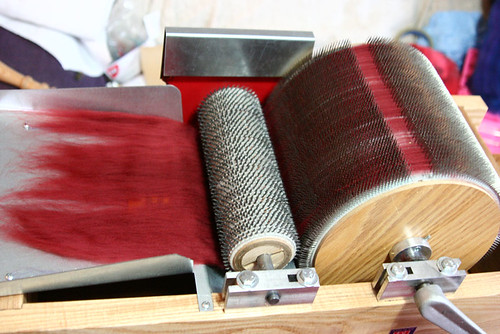
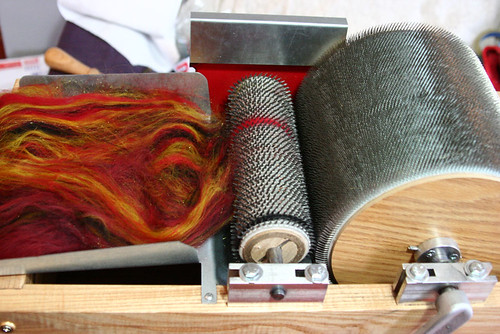
This will give you a lovely sheet of fibre with all the individual fibres running parallel. Place the fibre in the feed tray of your carder:

4

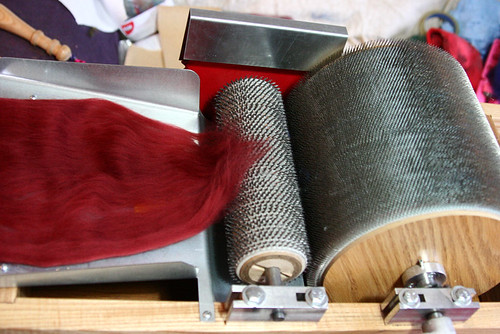
You will notice that the fibre doesn’t reach the edges of the tray. This is where your other hand comes in, as well as using it to gently guide the fibre into the tray, you can also stretch the fibre out so it fills the full width of the drum. Once you’ve got it started, it will continue to follow the same path, so you’ll only need that hand to guide rather than spread the fibre too. Remember not to pull on the fibre, just hold it gently and guide it along as it gets pulled in.

5

I normally use around a 30-50cm length of tops at a time…shorter if I want a more blended batt, so I can get thinner layers of different colours.

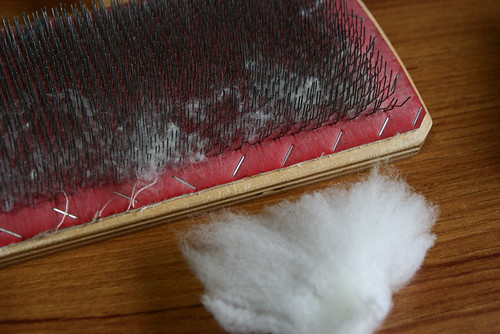
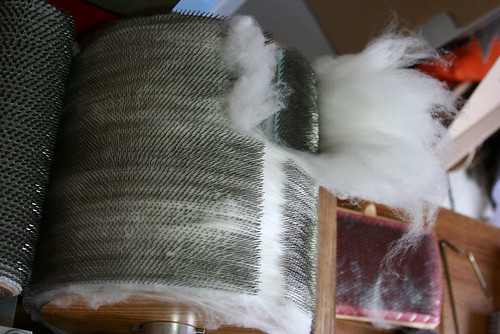
When you’ve finished with the first section of tops, repeat the process with your other bits, alternating colours each time. When you come to add sparkle, you won’t need to use anywhere near as much as you would do wool. In this batt I put in 3 or 4 layers of gold trilobal nylon, using about this much each time:
6

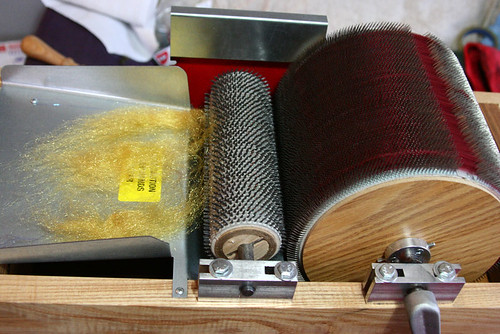
Even this fairly small amount adds a lot of glitz to the batt…here it is on the carder:

7

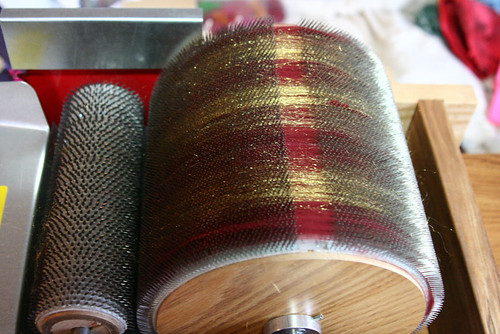
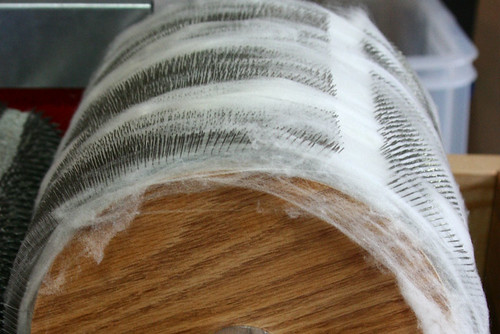
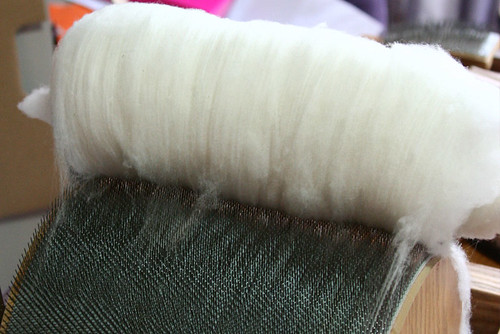
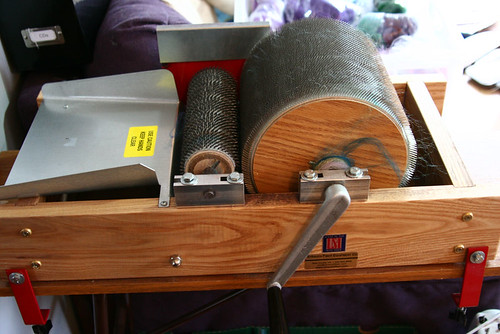
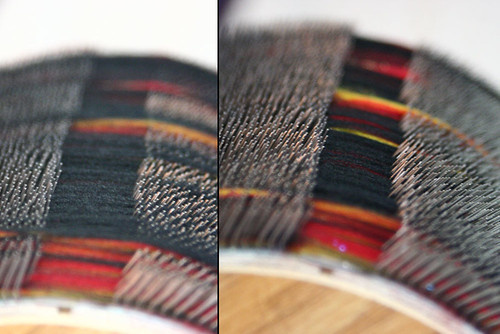
After a few layers of fibre, the carder will start to look full, the fibre on the main drum will be getting close to the top of the teeth. In fact, it’s nowhere near full, it just needs squishing down. Run a bristle hairbrush over the drum while turning the handle, and this will compress the fibres and allow you to add more. The below pic is of the drum before and after going over with the brush.

8

Keep adding more layers in different colours until you’ve used up all your fibre, or until the drum is so full that even brushing it won’t allow you to fit any more on. My carder will hold up to around 110g, though I try not to make batts much larger than 80g.

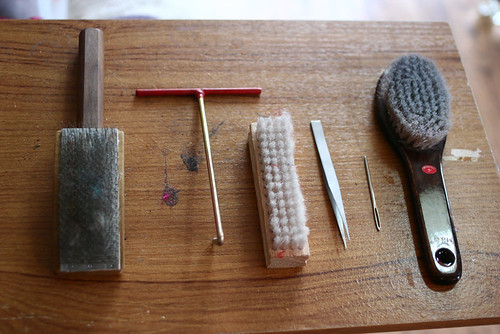
When removing the batt, use your doffing tool to free a small amount fibre each time, working your way along the space between the teeth until the whole batt is no longer joined.

9

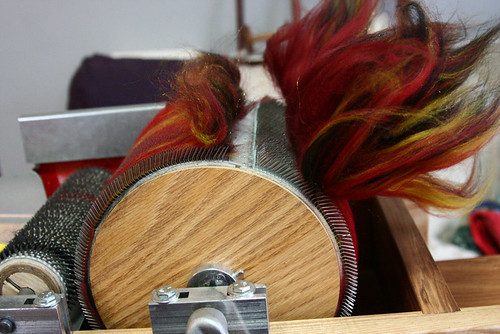
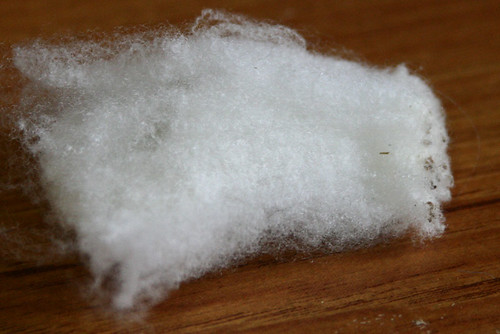
Take the fibre, and roll it up away from the join. If you keep your hands close to the drum when rolling, there shouldn’t be any stray fibre remaining on the drum.

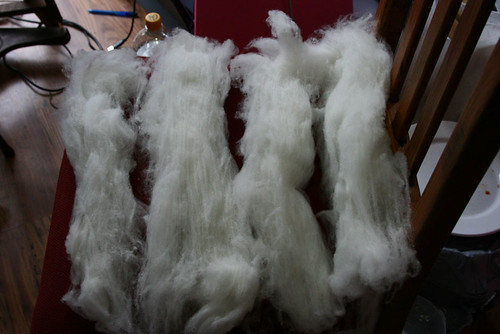
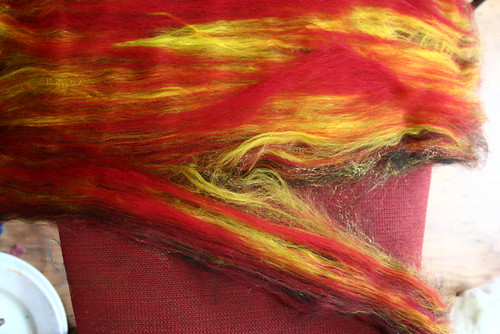
The batt currently looks a little messy and not that well blended, so it’s time to recard it to even it out. Tear a thin strip off the edge of your batt:

10

The strip should be about 1/3-1/2 the width of the feed tray, or less if it’s a very thick batt. Take the strip and pull it apart from side to side, to thin it out, and make it the full width of the tray:

11

Recard this strip as before, gently guiding it in with your hand while you turn the handle.

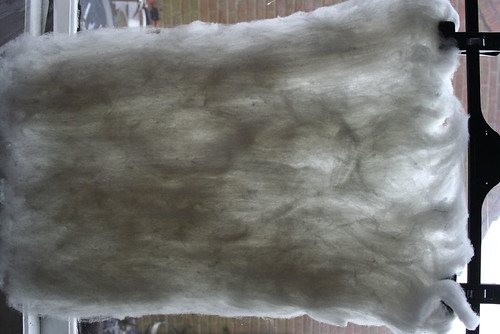
Repeat this process, tearing off strips and spreading them out, then carding them. When it’s all done, remove the batt:

12

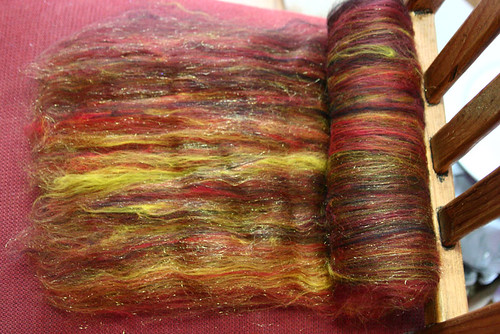
This is the effect I was looking for…blended, but not uniform, so the final yarn has patches of different colour. If you want a uniform batt, then repeat the stripping and carding process again until you are happy with the result. If you are blending different fibres (such as wool and silk), you will probably want to do 3 or 4 passes through the carder in total to get a smooth blend so you don’t come across patches of a single fibre when you are spinning.

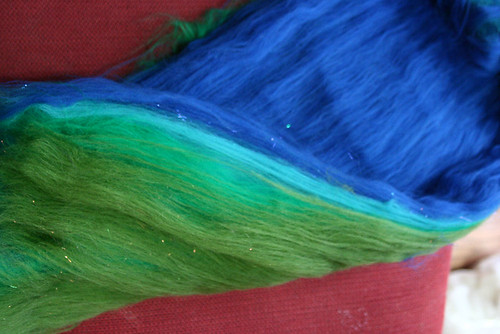
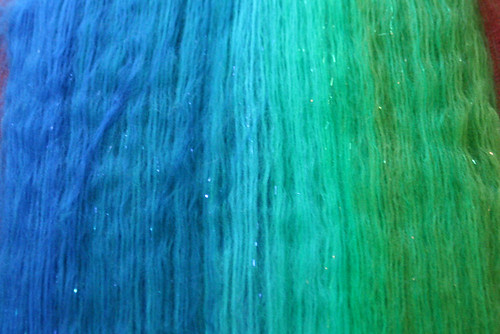
For the next blend, I wanted to make a batt that faded from one colour to another across its width, with a little sparkle added. Here are the colours in the sequence I wanted:

a1

When I first started carding, I would have torn off thin strips of each colour and laid them side by side on the drum. While this works, it’s fiddly, and you don’t get a nice shading from one colour to the next….so these days I use the below method instead.

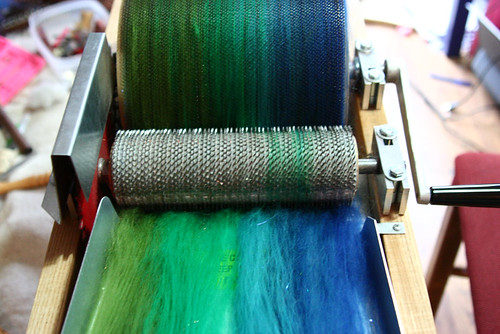
Card your fibre, as above, in layers. Start with the colour you want on one side of the batt, and work your way through them. I split each colour of roving in half, and put a small amount of angelina fibre inbetween the two layers of the same colour…green angelina with the green shades, blue with the blues.

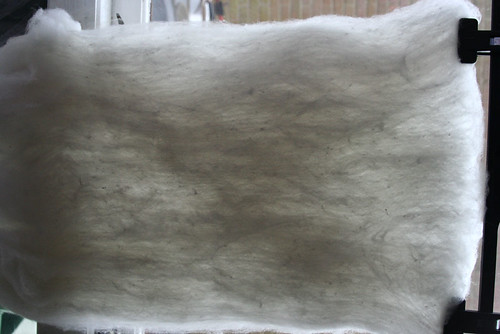
When your batt comes off the carder, it should look something like this, a solid colour each side, with layers of other colours in between:

a4

Now you have to recard the batt to get the colours running across it.

As before, tear off a thin strip from one side of the batt. This time, rather than spreading it out flat, turn it on its side, so the layers of colour are running from one side of your strip to the other:

a5

Repeat for the rest of the batt. Don’t worry too much if the colours don’t match up exactly from one layer to the next, this is what gives the final batt the shaded effect. When you’ve finished, your final batt should look something like this:

a6

I hope this gives you some inspiration and the confidence to try making your own batts. Don’t be afraid to experiment with colours and textures, you may come up with something you really love!

Links to the rest of this tutorial

Part 1: The basics

Part 2 : Carding raw fleece

How to use a drum carder: part 2, carding raw fleece

This tutorial was originally published on vampy.co.uk all the way back in 2009, and has been updated slightly for use here.

This post will explain one method I use to card raw fleece on a drum carder. The basics of using a drum carder are explained in this post, and a future post will cover blending of fibres.

The method outlined below is time consuming, preparing the fleece before carding is a lengthy process, and the amount of pre-preparation needed depends on the state of the fleece, and the desired end result. This is not the fastest way of doing this, but it’s the only way I’ve found that works with fleeces with dirty tips or lots of VM. Unlike combing, which keeps only the best fibre and leaves the rest behind, carding is very much a ‘rubbish in, rubbish out’ process, so if you want top quality results, you must be prepared to spend either a fair amount of time preparing your fleece before carding, or a fair amount of money buying a fleece that has been coated and is free of VM (vegetable matter).

First, your fleece needs to be clean. Using a drum carder with unwashed fleece will get your carder very dirty and covered in gunge that will be hard to remove and will contaminate future batts. It may also damage your carder.  There are plenty of fleece washing tutorials available online.

The fleece I am carding in the below images is a cormo fleece. It was a coated fleece so there isn’t much VM, but some of the tips were caked with mud, and I didn’t want this mud to get into the batts. In the below pic you can see a lock of the fleece, with its dirty tips, and also a few nepps at the butt end (which are a common feature of lots of raw fleeces). [clicking on any of the pics will take you to a larger version in my flickr account].

cormo1

I don’t want any of the bits of mud, or the nepps, in my final batt. It’s very difficult to get a completely nepp-free batt, especially with a wool as fine as cormo, but the method shown helps get out as many of them as possible before carding. To remove the dirt and nepps (and any VM), grab the lock about half way down the staple, and run it over a hand carder laid flat on your lap. You can see that the bits are gone, the wool is fluffed up, and there’s a few lumps left behind on the carder. If the fleece had VM in, most of this would also be trapped by the teeth of the carder.

cormo2

Turn the lock around, and repeat the process to detangle and remove any nepps from the bottom end. Repeat this process for as long as your patience will allow, or until you have enough fibre to make a batt.

Place your opened up locks of fibre on the feed tray of the carder. Don’t overfill the tray, you should be able to see the tray through the fibre.

cormo3

Slowly turn the handle of the carder with one hand, while using the other to gently guide the fibre towards the licker in drum. Don’t pull on the fibre, just hold it in place while the carder pulls it in. The fibre will wrap around the large drum in thin layers. If you’re using a fine fibre like I am, you will probably find it doesn’t want to sink to the bottom of the teeth, and there will be patches of wool close to the top of the teeth like this.

cormo4

If there are any noticeable lumps or bits of unwanted fibre/VM close to the top of the teeth, pull them out now, then use a hairbrush or similar to push the fibres down while turning the drum.

Add more fibre to the feed tray, and repeat this process several times, until the carder starts to fill up. You may find that some fibre wants to fall off the edge of the carder like in the below image. For the first pass on a raw fleece, I ignore this, provided it doesn’t start to get near the axel or moving parts of the carder. If it does start to go to places it’s not wanted, pull the fibre up and either place it on the edge of the drum, or pull it off and put it back in the feed tray, and in future try to feed the fibre a cm or away from the edge of the tray to stop it happening again.

cormo5

Once you’ve run out of fibre, or when the drum is starting to get full, you need to remove the batt. Use your doffing tool (mine is called a ‘knuckle saving batt pick and came with the carder)…a knitting needle can be used too, but watch your hands on the teeth. At the break in the card cloth, use the tool to free a small section of fibre at a time, you shouldn’t have to pull hard, if you do, you’re trying to do too much at once.

cormo6

Once you’ve severed all the fibres, run your tool along the gap to make sure there are no more small areas of fibre joined together, then you’re ready to remove the batt. Roll the batt off the carder (some people suggest to roll it around a rod, I’ve never found this to be necessary), keeping your hands as close to the carder as possible to pick up as many stray fibres as you can. You’ll see the drum is almost completely clean, the few straggly fibres which are still attached will be picked up as you roll. On the first pass, there may be a few fibres which aren’t joined to the rest of the batt that want to stay deep in the teeth…remove these after the batt is taken off by running your flick carder over the drum.

cormo7

When your batt is off the carder, hold it up to the light and have a look at it. You’ll see the wool isn’t even at all, there are clumps, and areas where the fibres don’t run parallel…and you’ll also see in my batt, despite my best efforts, there are a few nepps. I am fairly sure these were always in the fleece and weren’t caused by me trying to card too much at once, or being too rough, though with a very fine fibre, you will start to add nepps however careful you are.

cormo8

Take your batt, and tear it into strips lengthways. Each of these strips will be fed through the carder again. In the photo, the strip on the left is small enough to be recarded alone, the others were split in half again before carding.

cormo9

Take one of your strips and spread it out width-ways with your hands, so its about the same width as the feed tray, then recard it, the same as before, turning the handle slowly, and using your hand to guide in the fibre.

cormo10

Repeat this with the rest of the batt, then again remove the batt and hold it up to the light. You’ll be able to see the batt is more even, with fewer fibres travelling in the wrong directions.

cormo11

Tear this batt into strips, and repeat, until you are happy that your fibre is carded enough. I did one more pass, making 3 in total, and I may do another one, but I don’t want to add more nepps.

My batt after 3 passes is looking a lot more even.

cormo12

And that’s it…your batt is ready to spin!

A note on different methods.

If your fleece doesn’t have dirt, lumps, or VM in, you don’t need to comb the locks before carding unless the fleece is matted together. If the fleece is light and airy, you can just grab a chunk of it, and pull apart with your hands to separate the fibres. You will end up with a light and airy cloud of fibres, which can be fed into the carder in the same way as above. As the fibres will not all be parallel in this cloud, you’ll need to do several more passes to get it smoothly carded, I find normally around 6 passes gives me a lovely even airy batt.

If your fleece is clean but a bit neppy at the butt end, you may decide you don’t want to remove the nepps, to give yourself a textured yarn. Again in this case you don’t need to spend time combing them out, just fluff up the fibres and card, and the nepps will be incorporated into your batt.

Links to the rest of this tutorial

Part 1: The basics

Part 3: Blending fibres

Using a drum carder – part 1, the basics.

This tutorial was originally published on vampy.co.uk all the way back in 2009, and has been updated slightly for use here.

This is a huge topic, so in this first post I will go over the basics. Future posts will cover carding raw fleece, and blending commercially prepped fibres.

First, the basics. What is a drum carder?

A drum carder is a machine which is used to prepare fibre for spinning. It has two drums, one small one (sometimes called a licker-in) which helps guide in the fibre, and then a large one, which the fibre ends up wrapped around. When the larger drum is full, the fibre is removed, and the resulting chunk of smooth fibre is called a batt.

There are several different makes of drum carder, I have a Strauch carder, which can be seen here. I chose the Stauch because it has finer card cloth than the others available, meaning it can be used for carding finer fibres, because the licker in cloth is of a unique design that doesn’t trap the fibre, and because it is chain rather than belt driven, meaning it will hopefully last as long as I do. Since I originally wrote this post, there are more other brands of carder easily available in the UK, so don’t feel you need to import one to get a good quality product,

My carder (pre-cleaning as I took the pic to use in my cleaning tutorial, which never actually appeared!):

strauch

Tools needed to go with a carder

If your carder doesn’t come with clamps to attach it to the table, then these are a very worthwhile investment to stop it moving around as you card and while you’re removing the batt. Here is a photo of the other tools I use with my carder:

tools

The three on the left came with the carder. They are:

Flick carder. Can be used for opening locks of raw fleece before carding, and also for cleaning the drum. I only use it for the latter, I prefer to open locks on a hand carder laid flat on my knee. To use it to clean the drum, hold it against the large drum while turning the handle the opposite way you’d turn when making batts (normally anticlockwise). Don’t move the flick carder from side to side while the drum is turning, do one rotation of the drum with it in one position, then stop and move it over.

Knuckle saving batt pick. This is used to get the batt off the carder. At one place on the drum there are no teeth. When the carder is full, you use this tool along the toothless part of the carder to separate the fibres, an inch or so at a time, until the batt is no longer joined.

Brush. This small brush looks a little like a nailbrush, and is used for cleaning the licker in drum. Due to the design of the cloth on the Strauch, the drum doesn’t get covered in fibre like some other models, but sari silk and angelina especially seem to want to get trapped on it, so brushing with this brush helps free them.

The other tools are my own, and I find they help considerably with using/cleaning the carder.

Long thin forceps. Even after cleaning the drum with the flick carder, there are sometimes a few stray fibres which remain. These forceps are thin enough to get in between the teeth to pick out any fibre left over after cleaning. They are also useful for pulling off any fibres which get wrapped around the axles of the drums. Note that while they are thin, the tips are not sharp, so they don’t damage the cloth.

Large needle. I use this to lift off the fibre from the flick carder after cleaning the drum.

Bristle hairbrush. I couldn’t afford a carder with a brush attachement, so I run this over the drum between layers to squish down the fibres and enable the carder to take more fibre in one go.

How to use a carder, the basics

Most carders have a tray onto which you place the fibre. As the handle is turned, the licker in drum pulls the fibre in under the drum, and deposits it on the larger drum. The large drum turns faster than the smaller one (mine turns 5 times faster), so the fibres are pulled apart as they are deposited onto the drum, smoothing them out.

Here are a few tips which will help you get the best from your carder:

– Don’t put too much fibre into the feed tray at once. You should just be able to see the tray through the fibre. If you put too much on the handle will be hard to turn and the fibres may tear or get caught between the drums. If you are carding commercially prepped roving, you can use as long a length of roving as you like, just make sure the piece is thin enough that the carder runs smoothly.

– Guide the fibre in with your hand. Place your hand on top of the fibre in the feed tray and gently hold it in place, moving your hand as the carder pulls it in. Don’t pull back on the fibre, this will encourage it to wrap around the smaller drum, instead just gently guide it to keep it feeding in smoothly.

– Turn the handle slowly. After a little use you will be able to feel how fast you can turn it and still have the fibres deposited smoothly on the drum. Turning it too fast will be harder work, and may rip the fibres, causing nepps (lumps) in your batt.

– If your carder doesn’t have a brush attachment, get a bristle hairbrush and run this over the drum while turning it between layers. This will help compress the fibre and allow you to get more on the drum. This is especially useful with very fine fibres like angora, which want to fly away all over the place and don’t embed into the teeth on the drum easily by themselves. Paintbrushes and wallpaper brushes can also be used.

– Don’t allow the fibre to ‘fall off’ the edge of the large drum and wrap around the axles or anywhere else on the carder, as this may damage it. It happens to everyone sometimes, but try and move the fibre as soon as it starts to do this, and pull it off the axle immediately.

– When removing the batt, use your doffing tool (sometimes called a batt pick) to free up just an inch or so of fibres at a time, if you try to do too much you’ll find it very difficult, and you may rip the fibres. Once the batt is separated, take the end furthest from the small drum, and roll the batt up, keeping your hands close to the drum so more of the stray fibres are kept within the batt. The drum will move by itself as you carry on rolling, until your batt is freed.

Links to the rest of this tutorial

Part 2: Carding raw fleece

Part 3: Blending fibres


August 2018 – Fibre prep revisited

This month’s planned meeting on synthetic dyeing had to be postponed due to a scheduling conflict, so Susan took over and led another meeting about fibre prep. She demonstrated using a drum carder both to prepare fibre, and to blend ready prepared fibres, and talked a little about the difference between carding wool and alpaca. Members who had previously expressed dissatisfaction with their carding technique realised the benefit of slowing down and doing a little extra prep work beforehand to end up with some really nice batts. She also gave a short demo on how to use the combs with a wonderful Mule X fleece brought by a member.

The information on how to use a drum carder will soon be available on this website.

July 2018 – Plying

This month’s meeting was lead by Maggie, who discussed different types of plying and their structures, and demonstrated Navajo plying. The benefits of navajo plying in relation to preserving colour sequences was also discussed and demonstrated in a lovely sweater spun from natural colours of Jacob fleece, and various samples.

What to do with leftover singles was also discussed, leading on to talking about Andean plying. Many members brought their wheels and both had a go at navajo plying, and worked on their own projects.


Revamping an old loom

We have a few bits and pieces of old rigid heddle looms in our store. Unfortunately neither of the looms had heddle blocks to hold the heddle in position while the shed was open, and the heddles we had were 16″ wide, while the loom was 22″ wide.

The loom was perfectly useable like this, just not especially user friendly.

With a couple of bits of plywood and some blocks, it was a simple task to make something to hold the heddle in a neutral position, as well as up and down.  The important thing to be aware of was to get it all lined up so the holes of the heddle were level with the path the warp takes between the beams while the heddle was in the neutral position.

With this done, a couple of elastic bands to hold the heddle in place, and a couple of spare warping pegs to stop the loom from slipping, direct warping was possible.

The loom is now warped and ready to be woven on. We will be taking it to the Royal Norfolk Show on the 27th and 28th of June, so if you want to have a go at weaving for yourself, the RBST are kindly hosting us in their tent. We will also be doing spinning demonstrations and crafts for children. Hope to see you there!


May 2018 – Preparation for spinning and felting

Preparation of Fibre for Spinning. 

Members were treated to an excellent talk and demonstration on this topic today by fellow member Susan Pearson. Susan had numerous examples of fleece of different qualities as well as a variety of finished examples of knitting from her spinning. She  covered hand carding , drum carding  and using wool combs to produce a variety of prepared  fibres, both naturally coloured and involving blended  colours. Her attention to detail and preparatory work before the carding process was a delight to see and clearly showed itself in the quality of the yarn produced. Many Thanks Susan, we were only sorry the session wasn’t longer. 

Before the session, Susan’s enticing range of carding related delights.

The show and tell contained a special item, Gwen’s nearly finished Inkle loom which she has made herself. Well done Gwen.

Gwen – with her Inkle Loom


April 2018 – Weaving with a loom

This meeting focused on weaving with a loom. Members brought in many different types of loom to discuss and try out. We had inkle looms, tapestry looms,  rigid heddles, table looms, a Saori Piccolo 2 shaft folding floor loom, and a loom set up for tablet weaving, all set up and ready to play with. The for sale table was popular with members and visitors alike, and all the linen yarn there was rescued from the tip!

Show and tell featured a year’s work in the form of a wonderful hand knotted rug, two beautiful Saori pieces, and a sample showing ten different twill patterns all from the same threading.


March at Makers Month, Norwich

During the week of the last meeting members of the Guild had joined with other Norfolk Guilds to demonstrate, run ‘have a go sessions’ and workshops, at The Forum In Norwich during Maker’s Month.
This is a view from the Saturday where Guild members can be spotted. Mary, representing the Rare Breeds Survival Trust, was outside spinning Whiteface Woodland Fleece from a sheep shorn in public that morning.